Showing posts with label Guest Designer posts. Show all posts

Saturday, March 26, 2011

Happy Saturday!

Hi everyone, I hope everyone is enjoying their Saturday. I know I am. Today I am a guest designer on shesasassylady. Saturday is not my usual day to post on Shesasassylady, I was due to post on Wednesday of this week, but the project I was working on Monday night ended up going into the trash. So Sheila covered for me on Weds and let me have Saturday. Thank you Sheila for helping me out.

Today I wanted to share with you a project I made, inspired by the Accucut Craft website. Gasp I know, not a Cricut/Gypsy Product to be found there, or is there?? I love Accucut's dies they have, but I don't have any of their stuff, but I do have my Gypsy, so............, once again I used George, Plantin, and 2 other cartridges to create my own Shadow Box Portrait die cut.

You will need several sheets of 12x12 pattern paper that coordinates(I used DCWV Mademoiselle)
fedex envelopes or similar chipboard
Assorted embelishments, I used Basic Grey Curio chipboard adhesive backed pieces
Glue/tape runner/double sided tape(you choice)
Tim Holtz Distress ink Vintage Photo


This is the back of the picture frame, cut one from thin chipboard, I used Fed Ex envelopes. one from black cardstock(this is attached to the back to cover the ugly chipboard), and one from a piece of pattern paper for the front(Not shown yet).

chipboard

black cardstock

Glue all 3 piece together making a chipboard sandwich.  Black on back, chipboard in between, and Patterned Cardstock on the front.  I held it together with Tim Holtz binder clips until dry.  Make sure you glue edges and in the middle of the chipboard because you will score and fold slightly and you don't want your chipboard to pull away from either piece of cardstock(like mine did).  After the glue has dried, I scored the piece as shown in the above pic. You can also see the score lines by looking at the Gypsy Screen.

  The below screen is the cut file for the front that pops out.  You will see what I mean later in the post.


(this pic shows side already scored and folded in, and the large double scalloped piece with the bottom cut off)

Cut one from Chipboard, one from black cardstock,and one from a coordinating pattern paper that goes with the one you glued on the front of the back part of the frame.  Make a chipboard sandwich using lots of adhesive and score the sides.  You can see the lines by looking at the screen you just cut with your Gypsy.


Here it is assembled. You can see what I mean by the facing of the frame that pops out at you.

This pic is just of some addnl cuts I did of coordinating pattern paper to embelish my frame with.
And here is the finished project.  Don't forget to ink your edges of all of the pieces while you are assembling them.


The picture in the frame is a scanned copy of  my dad when he was 11 and his little brother Matthew.  Matthew passed away within a year after this pic was taken.  My dad told me he had one of the first diagnosed cases of Luekemia in Indiana, the doctors didn't know what it was.  This pic is special to my dad so I am giving him this as a small gift.

Thanks everyone for sharing their Saturday with me, and thanks Sheila for having me as a guest designer.

Beth
Wednesday, February 23, 2011

Oh Baby!

Today I am a guest designer on Shesasassylady.   Since this has been a long bleak winter, and I am getting tired of the grey dark skies, I thought I would make my post today bright and cheery.  Today I am going to show you how to make a star photo album.  This type of album has been around for a long time, and I had always wanted to try one.  If you google it on youtube, you can find videos of it.

I started with cardstock cut to the following sizes:

6 @ 12x4 of one color
6@ 12x4 of a coordinating color to the above
6 @ 10x4
6 @ 10x4 of a coordinating color to the above
6 @ 8 x 4
6 @ 8x4 of a coordinating color to the above


So when you are done cutting cardstock you will have 12 @ 12x4, 12 @ 10x4, and 12 @ 8x4.  Glue all of the above back to back.  So 6 of the 12" long adhered to the other 6.  6 of the 10" long adhered to the other 6, and 6 of the 8" long adhered the other 6.  You will then have 18 sets of cardstock.  Score these in the middle.

Next cut stiff chipboard(I used the back of a note pad that I got from work).  Cut 2 pieces 6.25 x 4.25 

Cover these with cardstock that coordinates with the pages you just made. 
These become the front and back cover of the album.

Glue ribbon on the inside of the  covers on the bare chipboard.  Cut 2 pieces of  cardstock, 6x4 and glue on top of the ribbon.  This is shown as the green cardstock below.  The ribbon holds the album open or closed.

Take the scored pages you created and glue them together layering the longest, the next to the longest and the shortest.  Only glue the outer edges of the album, making the edges even. 


After you have created 6 sets of glued packets, start gluing all of the longest ones together, outside back to outside front, and then glue the front covers on so when you are done it looks like this. 

Here is the outside decorated.  I used the carts Bloom, Home Accents, and Picturesque.  I did weld the bird from Picturesque to the branch from Bloom with my Gypsy.  I also created a welded shadow with the bird and the branch.  The flower is from Bloom cut in 3 different sizes.  All cuts were inked and the flower has stickles applied.


The reason I titled this post "Oh Baby" is because I pulled out 12 pictures of my daughter when she was anywhere from 1 to 3 and put them in the album.


Here she is prior to 15 month's old.  I had a cupboard that was full of tupperware lids and she would spend everyday pulling them out and I would spend everyday putting them back in.  She couldn't hurt herself, and she had so much fun, I thought what harm is this. She would crawl so far in that only her diapered butt was sticking out.  10 minutes later she would get bored and move on to something else, leaving me with lids to put away. 

 This pic was on her 2nd birthday.
She had a head of hair from the day she was born. 

Here is the album finished, it can be displayed open on a library shelf or coffee table.

Well, I hope you can understand my garbled directions, and like I said, if you need help with the instructions you can find them on youtube under Star Album.

Thanks Sheila for allowing my to be a guest designer today, it always challenges me.
Beth....

Wednesday, January 26, 2011

Altered Printer's Tray.


Hi everyone, today I am a guest designer on Shesasassylady.  Today I wanted to share my altered Printer's tray that I got at Hobby Lobby for $5.00.  I was at Archivers over Christmas and noticed the 7 Gypsies Printer's trays.  It was the first time I was privey to one, and I was immediately hooked.  They had one decorated up, and I knew I needed to make one.  Theirs was 19.99, but I couldn't bring myself to spend that much on one when they had so many other things I wanted to spend my money on, so back on the shelf it went.  On the way out, I was thinking if I talked real nice to DH, he could make me a knock off.  Anyway, a week later I was shopping at HL and they had the Paper Studio's printer's trays for half off their normal price of  $10.00, so I grabbed 2.  A white one and a black one.  Here is the black one.  I started with 3 pics that I printed in b&w so they would not clash with my color scheme.  I had bought some Lost and Found paper while I was at Archivers that had a valentine's theme to it with red glitter accents.  I love, love, love this paper, double sided and thick.  I used it as accents in the cubbies that did not have any pics in them, it was already pre-decorated.
For the cuts, I used the following carts:
Cake Basics
Gypsy Wanderings
and MS Season Cake Art(my new go to cartridge besides George)

I got the idea for the ribbon off of the Circle Blog,  I ordered the seam binding off of ebay(white), took some glimmer mist and colored my own ribbon.  I sprayed the ribbon in a bowl and let it set overnight until it was dry.


I then placed this ribbon between the scalloped heart and the regular heart.


I inked the edges, applied stickles, cut the banner off of the MS cart, stamped letters on it and attached the banner to some string, and finished decorating the heart.


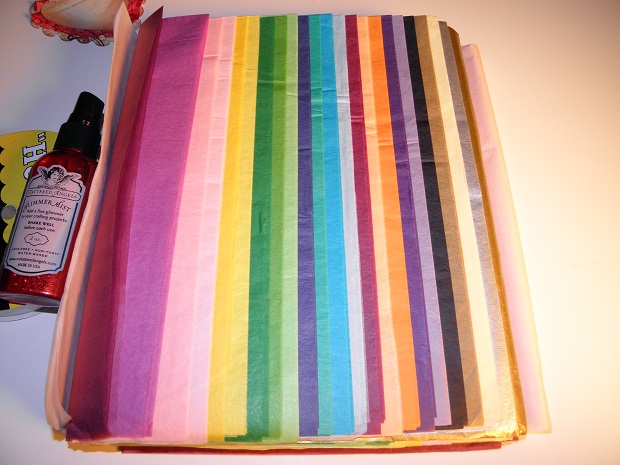
The flowers above came next.  I saw the idea from the flowers on HSN the other night.  I started with luscious tissue paper I got from Micheals in a large quantity.


Took out the red, which already had 8 layers to it, folded it in half and ran it thru my big shot(sizzix). So I was working with about 16 layers of tissue paper. (It cut like butter).


I stapled these in the middle and took each layer and crumpled it one by one.


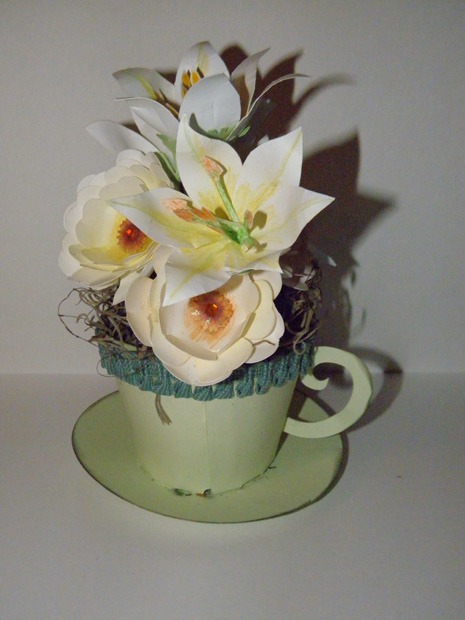
I ended up with these really cool peony looking flowers.  Remember, this will work with any symetrical flower die, circle die, or scalloped circle die.

Here is the finished project.


added more stickles here and there, a ticket, doilies, etc. and I was finished.
Thanks Sheila for having me as a guest designer.
Beth


Wednesday, December 22, 2010

Guest Designer on She's A Sassy Lady today.

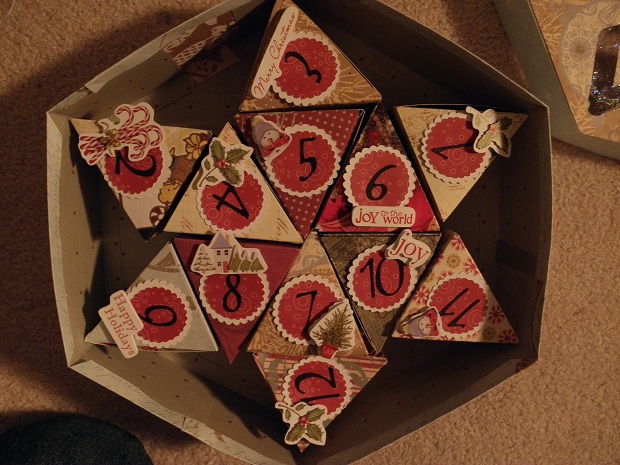
Hi everyone, today is my turn to be Guest designer on shesasassylady.  Today I wanted to share a gift I made for my SIL for Christmas.  I was browsing thru an older crafting magazine and I noticed an ad for Karen Foster Hexagon box with individual gift boxes inside counting down the 12 days of Christmas.  I did not have the box but thought is was a cute cute gift idea, so I took my Gypsy, George, Cricut, and lot's of patience, and made my own.  I started by welding triangles and rectangles to get a box that I could score and fold to create a triangle shaped box.  I could fit 2 on a page so I copied it. I cut this 6 times out of the Old Fashioned Christmas pad from Recollections that I got at Micheals.   With 12 boxes cut out, I scored and folded and glued them together.  I then needed a box to put them in.  I searched my Gypsy and came up with a hexagon shape and sized it 11.55x11x55 and cut out the bottom of the box.  I then took 1 sheet of 12x12 cardstock and cut 3 pieces that were 12x4, and scored them 1/2 on one long side. I then started the task of glueing and folding these to the base hexagon to created the bottom of the box.  After that was done, I was 1 section short, so I cut one more 12x4 and used what I needed from it.  So in all I needed 4, 12x4 pieces of cardstock scored on the long side 1/2" in from the long side.  
To make the lid, I cut the same hexagon again, but added a snowflake cut in the middle of the lid.  I had to create the sides the same way for the lid as I did for the bottom, except I cut the 4 pieces 12x2 and then scored 1/2" from the long edge and glued them to the bottom of the lid.


I cut graffix plastic to fit behind the snowflake cut out, adhered, and where you could see thru the snowflake, I took stickles in clear and smeared it around on the plastic with my fingers.

After the boxes were completed I needed to dress them up a bit.  I cut 2 sizes of scallops one in red and one in white, 12 times, and then cut the count down numbers 12 to 1 in black.


Here is the finished gift.


I entered this in the Circle, Monthly Circle Blog Challenge.  The rules state you need to use 2 cuts from your cricut, red, ribbon, a phrase and a tag, so I added the above to finish the look.

I also added some really cute dimensional stickers I got from the Dollar Bin at Micheal's.

I am going to stuff either white tissue paper in the empty spaces, or use the shredded paper in green or red.  I did not have any in time for this post.  I started filling the boxes with treats, and am planning on adding a gift cart to her favorite store.  I hope she doesn't see this before Christmas.

Hope you like the project today, and from all of us at Thunderbirdlindy By Design and the White household, MERRY CHRISTMAS, and Merry Christmas to you Sheila, thank you for allowing me to be a guest designer on Shesasassylady.

Friday, November 12, 2010

Chinese Take Out a la Gypsy

Hi everyone, today is my day to be a guest designer on The Bug Bytes.  I wanted to share with you some Chinese take out boxes I created on my Gypsy using Opposites Attract and George Basic Shapes.  I had a major problem finding a trapezoid on the Gypsy that was symetrical.  I finally came up with one on Opposites attract, but even that one was kind of off kilter, but I went with it anyway.  This file is not perfect, but it turned out ok for what I wanted.  I had messed with the file numerous times before I scrapped the whole thing(no pun intened) and started over.  At that point I was running out of time so I went with what I had.
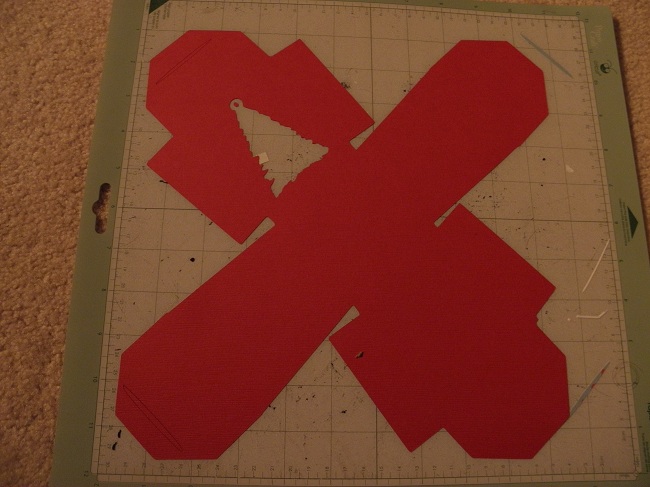
The first picture is on the file itself, sans Christmas tree cut, I added that later.  If you look closely, you can tell the image is not perfectly symetrical.


At this point I thought it would be cute with a window in it, so I added the Christmas tree from one of the Christmas carts.


I did not add score lines to the file itself, but did them by hand afterwards.  Did I mention this cut is not symetrical, and because of this, I just had to eyeball the score lines..

I tried to make sure I scored from the bottom corner of the box to where the top folded down 3.25" on all 4 sides so when the box went together, the top edges were even.
 I took 12" of 2 different colored ribbon and some heavy weight thread and a needle and with a gathering stitch sewed the 2 ribbons together by hand and gathered them to form a rosette.  Since I was only doing one, I didn't get out the sewing machine.

I really love these rosettes, they are so easy, and add so much to a project.

I had 3 prototypes before I settled on the last design but I thought I would decorate and throw them in to the post also.  They don't look bad, especially after being decorated up.
Here is a pic of all of my boxes, they would look great with 25 cut out and used a count down to Christmas Calendar maybe strung on a string in front of a window..  The first 3 are the prototypes(can you tell my husband is an engineer?)  The last one with the tree is the final one.


Close ups, I added a piece of Cricut Cart Plastic to the inside of the tree cut so my goodies would not fall out.  I have purchased so many carts, I don't think I will every run out of plastic.


Well thanks for visiting today, you are the reason I do this!  If you are interested in the cut file, email me (rwhite58@maplenetbroadband.com) and I will post on my blog.  I didn't want to just put it out there with it not being perfect.

Until next time, keep crafting, Beth.