
Showing posts with label Wall Art. Show all posts

Wednesday, January 26, 2011

Altered Printer's Tray.


Hi everyone, today I am a guest designer on Shesasassylady.  Today I wanted to share my altered Printer's tray that I got at Hobby Lobby for $5.00.  I was at Archivers over Christmas and noticed the 7 Gypsies Printer's trays.  It was the first time I was privey to one, and I was immediately hooked.  They had one decorated up, and I knew I needed to make one.  Theirs was 19.99, but I couldn't bring myself to spend that much on one when they had so many other things I wanted to spend my money on, so back on the shelf it went.  On the way out, I was thinking if I talked real nice to DH, he could make me a knock off.  Anyway, a week later I was shopping at HL and they had the Paper Studio's printer's trays for half off their normal price of  $10.00, so I grabbed 2.  A white one and a black one.  Here is the black one.  I started with 3 pics that I printed in b&w so they would not clash with my color scheme.  I had bought some Lost and Found paper while I was at Archivers that had a valentine's theme to it with red glitter accents.  I love, love, love this paper, double sided and thick.  I used it as accents in the cubbies that did not have any pics in them, it was already pre-decorated.
For the cuts, I used the following carts:
Cake Basics
Gypsy Wanderings
and MS Season Cake Art(my new go to cartridge besides George)

I got the idea for the ribbon off of the Circle Blog,  I ordered the seam binding off of ebay(white), took some glimmer mist and colored my own ribbon.  I sprayed the ribbon in a bowl and let it set overnight until it was dry.


I then placed this ribbon between the scalloped heart and the regular heart.


I inked the edges, applied stickles, cut the banner off of the MS cart, stamped letters on it and attached the banner to some string, and finished decorating the heart.


The flowers above came next.  I saw the idea from the flowers on HSN the other night.  I started with luscious tissue paper I got from Micheals in a large quantity.
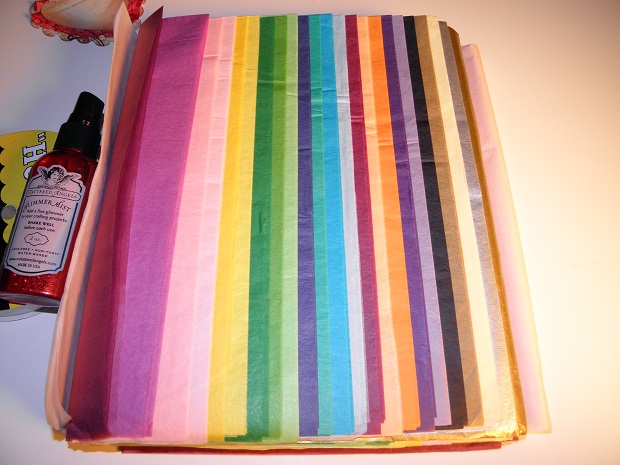

Took out the red, which already had 8 layers to it, folded it in half and ran it thru my big shot(sizzix). So I was working with about 16 layers of tissue paper. (It cut like butter).


I stapled these in the middle and took each layer and crumpled it one by one.


I ended up with these really cool peony looking flowers.  Remember, this will work with any symetrical flower die, circle die, or scalloped circle die.

Here is the finished project.


added more stickles here and there, a ticket, doilies, etc. and I was finished.
Thanks Sheila for having me as a guest designer.
Beth




Sunday, August 29, 2010

Halloween challenge over at Erin Lee Creative

Erin is having a halloween challenge on her blog, and this is what I created for it.

I purchased 2 very cool cricut carts, Happy Hauntings and October 31st.  I love Halloween, and these carts have so much potential.

I started with a 12x12 frame and a piece of 12x12 cream colored cardstock.  With a clear swirly stamp, I stamped in orange and black swirls over the carstock.

With October 31, I cut the tree, house, fence, and owl.  Using my Gypsy, I also took the house and using hide contour on the house, I deleted all of the inside cuts on the house so I could have a solid  orange background for the black house to be mounted on.  With Happy Hauntings and vinyl, I cut the words happy halloween and put on the outside of the glass.  The tree was cut to a height of 11", and the house was cut at 6.5.  I put my pressure on medium for the cuts because they were so intricate.  I love how the fence turned out, its so delicate.

Until next time, keep crafting.

Beth


Wednesday, March 10, 2010


I created this after I saw a layout in a stamping magazine from Scrapbook trends. The picture was taken at Christmas time this past year.


I purchased a 12x12 frame from Micheal's that had a canvas back to it. I masked a 7"x7" area in the center of the frame, and using a Harlequin background stamp, I stamped around the mask using inks in fall colors. I then removed the mask, and added a 7x7 piece of card stock to the area. The picture was printed out larger then 5x5 and cropped so the final size would be 5"x5". I added ribbon and pearls as a border around the 7x7 cardstock. I also added rhinestone swirly bling around the 7x7 mat. I matted the 5x5 picture to coordinating card stock and added a line of stickles to the matting. Using my Gypsy and my Cricut I cut flowers in various sizes out of 2 sided mulberry paper and the Serenade cartridge. I crinkled the flowers, inked them, and added brads to the centers and arranged them in a pleasing design around the picture. I really liked how this turned out, and I hope you will too.

Thursday, March 4, 2010

Daddy/Daugter Dance Cuttlebug Challenge


This picture was taken right before the daddy/daughter dance in February. I wanted something to showcase it, so I created this. I love the way the colors and the design came together. I hope you will too.

Since Sassy Lady already allowed me to post on her blog, before I got mine set up, I am going to direct you to click on her blog for the instructions. Please click on She's a Sassy Lady under Blogs that inspire me.