Showing posts with label French Manor. Show all posts

Saturday, January 14, 2012

Butterflies in my Stomach.


Carts used:
Nifty Fifties,French Manor,Flower Shop,Fancy Frames
Paper K&Co.,Poster Board
K&Co Nature Die cut
Krinkle Ribbon from Corissa on Etsy(thanks Sheila from Shesasassylady, I love this stuff)


Cut dress form from Nifty Fifties on a 12x24 mat sizing image to 30" tall with base positioned off mat so only dress form portion cuts.  Cut 3 of these out of heavy cardstock for back.  Adhere all 3 together.  Add a frame from Fancy Frames in the middle of the dress form sizing the frame to 5.5 high.  Hide contour on the inside frame cut.  Cut 3 of these forms with the window cut out of the stomach.  Glue together. this makes the front and back. 

Cut strips of paper 3 x 12".  Score the long side .5" away from the edge on both sides.  These are what makes up the sides of the dress form and makes the form 3-d.  I cut into each strip almost to the .5" score line so when I started to glue these strips around the edge, I could contour them to the edge of the dress form.  I did the back first, then added the box that had been embelished, 


Next make a box that will fit inside the dress form, but make it large enough so that the edges extend past the frame cut out of the dress form. I made my box 2.5" deep. Line the box with paper, and add elements inside the box.  I added another mannequin, and a chair from French Manor.  I dressed up the mannequin, and the walls of the box.  

I then glued a piece of acetate behind the window on the front of the dress from.  Add the front of the dress form to the back section with the edges glued on, make sure you line it up with the box inside, and the edge back of the dress form. 

Next add a wooden dowel and base to the dress form.  I embelished it with paint and ink before I attached.  Dress the form any way you want.  I used 72 double layered flowers cut from flower shop for the back of the dress.  The bodice elements are K and Co. Nature die cuts.


I really, really like how this turned out, but I have no Idea what I am going to do with it.

Thanks so much for visiting, and remeber to leave a comment on the post below for your chance to win Victorian Romance.

Beth


Saturday, February 12, 2011

FOR THE LOVE OF EVERYONE BLOG HOP, with Blog Candy!!!

Preview

Hi Everyone, I can't believe I am doing my first blog hop.  This is very exciting for me, and I have been very busy making sure I didn't forget anything.  Blog List, Check.  Next Blog button, Check.  Blog Candy, Check.  Lets  see do I have everything..........Wait Oh Yeah, my project.  Silly me, I almost forgot.

I would like to share with you today a wreath I made for my Daughter's teacher.  Since our theme for the blog hop is Red Hot, I thought this quailified. 

Recipe:
Wreath approx 10"
Ribbon for bow and tails
French Manor
Home Decor
Gyspy Wanderings
Summer in Paris cricut cartridges
Assorted Paper to match Ribbon
addnl glittered ribbon or ribbon ofyour choice approx 3/8" wide
twine to hang heart in center
I also used K&Co Valentines embelishments


And now on to the Blog Candy, Just sign up to be a follower and leave a comment on this post by next Friday (2-18) at 11:59 PM and I will draw one person using random.org to win.  Please only one comment per person. Oh, and the candy is a brand spanking new Nursery Rhymes cart.


I also want to mention that our Sponser is Thirty One Gifts, and they have generously donated a wonderful tote.  All you have to do is leave a comment on all of the blogs participating.  The winner will be drawn randomly from one of the Blogs.

Here is the list of blogs participating in the hop in case you get lost.  Also to go to the next blog, just click on the button below.
She's A Sassy Lady 
Thunderbirdlindy by Design
Nana Donna's Card Dreams
Okielady's Scrap N'More_bug
MelissaMade 
Just Yolie, Just Create
Gaby Creates
Daily Grace Creations
The Cricut Diaries
The Cricut Couple


Sunday, July 11, 2010

Card created using the New French Manor Cricut Cartridge

I created this card using the the new Cricut Cartridge French Manor.  Unfortunately it is only available to Cricut Circle members.  You could use any images that you have available on any of your cartridges.

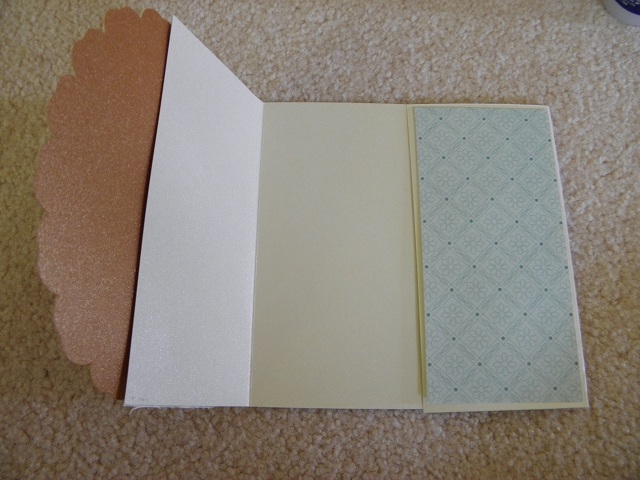
I started with a 6x12 piece of cardstock that I scored at 3" and 9".
I folded both 3" sections toward the center.  The card should now measure 6x6 when the flaps are closed.

I cut 2, 2.75"x5.75" pieces of coordinating cardstock and attached to the front of both flaps, as seen here under the scallop cut.


I then cut a scallop oval from French Manor at 5.75" and attached to the left side of the card only, centering it so when the card is closed it appears to be in the middle of the card.  I cut a second scallop oval from French Manor at 5.5" and layered over the first scallop oval attaching is with pop dots.

I cut the bird from the cartridge two times at 5".

I then layered the bird over the scallop oval one layer, then putting an addnl bird over that attaching with pop dots.


I cut 2 twig borders from the cart and attached to either side of the card, and I also add crumpled flowers that I cut from several layers of the flower scallop available on the cart, sprayed with homemade glimmer mist and attached with brads and glue. 

and Finally, I stamped sentiment on the inside of card.

Completed card.


Until next time,  Beth.